![]() Technical Details
Technical Details
![]() In
the beginning: All screws of the Brompton are metric! So be not concerned
about repairing or spare parts. At british engineers one thinks first about inch and
yards...
In
the beginning: All screws of the Brompton are metric! So be not concerned
about repairing or spare parts. At british engineers one thinks first about inch and
yards...
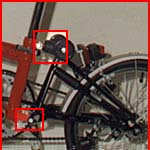
The Brompton rolls on 16"-wheels (there we have it now). Because the tubes have car
valves, they can be pumped easily to nearly 4 bar at the petrol station. The rear wheel
has a suspension: The rear wheel assembly is fixed revolving at its
lower end and leans on the mainframe
by a rubber element at its upper end (in
the picture at right marked with squares).
![]() Here
some more technical details:
Here
some more technical details:
- Mainframe: Steel
- Hinges: forged
- Weight: 12 - 13 kg
- Folded size: 56x55x25 cm
- Wheels: aluminium alloy rims
- Tires: 16 x 1 3/8" (37-349)
- Wheelbase: 1015 mm
- Saddle height: 760-980/1075 mm
- Bottom bracket height: 270 mm
- Handlebar height: 1015 mm
- Steering angle: 72.4°
 Gearing
3-speed: 3.83 - 5.11 - 6.80 m
Gearing
3-speed: 3.83 - 5.11 - 6.80 m- Gearing 5-speed: 3.37 -4.04 -5.11 - 6.44 - 7.66 m
Tips and Tricks
![]() The
following section is for those who have already a Brompton. Who is unsure about buying a
L-Model gets tips how to equip it with lights here.
The
following section is for those who have already a Brompton. Who is unsure about buying a
L-Model gets tips how to equip it with lights here.
![]() Build
on lights
Build
on lights
![]() The biggest disadvantage of the L-models is the missing lights. In Germany it
seems to be "cool" (especially for young people) to drive without lights.
Therefore I want to advise you to build on and use lights at your
Brompton. Because the lights are in a quite low position I recommend
additional reflecting stickers at the handlebars and the
top of the seat pillar. I am also on the way as car driver and look
especially after cyclists. During bad weather even I have problems to recognize bicycle
drivers. How much more dangerous is the situation for the bicycle drivers
caused by the naively and mostly too fast driving of other car drivers!?
So: Lights on!
The biggest disadvantage of the L-models is the missing lights. In Germany it
seems to be "cool" (especially for young people) to drive without lights.
Therefore I want to advise you to build on and use lights at your
Brompton. Because the lights are in a quite low position I recommend
additional reflecting stickers at the handlebars and the
top of the seat pillar. I am also on the way as car driver and look
especially after cyclists. During bad weather even I have problems to recognize bicycle
drivers. How much more dangerous is the situation for the bicycle drivers
caused by the naively and mostly too fast driving of other car drivers!?
So: Lights on!
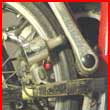
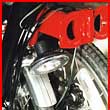
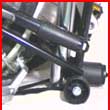
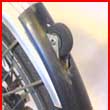
![]() Back
to Brompton: At right you see how I build on the dynamo: At the left side
of the rear wheel swing. Because of this it is situated at the outside of the folded
Brompton. This is a small disadvantage, especially because I use a Nordlicht-Dynamo. This collides
with the left crank if one doesn't look out. Before that I used smaller dynamos,
but they broke quickly at bad weather. You get used quickly to lift the crank
before folding in a position that it doesn't collide with the dynamo.
Back
to Brompton: At right you see how I build on the dynamo: At the left side
of the rear wheel swing. Because of this it is situated at the outside of the folded
Brompton. This is a small disadvantage, especially because I use a Nordlicht-Dynamo. This collides
with the left crank if one doesn't look out. Before that I used smaller dynamos,
but they broke quickly at bad weather. You get used quickly to lift the crank
before folding in a position that it doesn't collide with the dynamo.
At the T-Brompton the dynamo is mounted at the right side on a stable
girder of the rear carrier. Because of this it is situated in the inner
parts of the folded Brompton, like all other dirty or sensitive parts. This is not
possible with the L because of the lacking rear carrier.
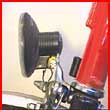
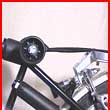
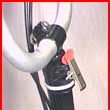
![]() The
front light is mounted quite simply. It is screwed to a sawed
normal holder fixed to the long screw of the front brake. Normal holders, which you can
buy are all too long. All parts you mount have to fit also with the
Brompton folded! I looked for a holder which was after sawing still strong enough that I
could drill the holes for the fixing of the light.
The
front light is mounted quite simply. It is screwed to a sawed
normal holder fixed to the long screw of the front brake. Normal holders, which you can
buy are all too long. All parts you mount have to fit also with the
Brompton folded! I looked for a holder which was after sawing still strong enough that I
could drill the holes for the fixing of the light.
![]() The
rear light made more problems for me. At the L-model the rear carrier is
missing, which works as a solid base for mounting dynamo and light (see "Models"). I found this solution: Sawing
a normal rear light, so that only the upper part with the lamp remains. Screwing
and glueing this to the rear reflector of the L-model. An even
better solution is to buy a socalled "Toplight" and to mount it
instead of the normal reflector. Both methods have the disadvantage of
the rear light bumping to the ground if the Brompton is folded. The reason for this are
the too small standard castors (rollers) on which the folded bike stands. So:
The
rear light made more problems for me. At the L-model the rear carrier is
missing, which works as a solid base for mounting dynamo and light (see "Models"). I found this solution: Sawing
a normal rear light, so that only the upper part with the lamp remains. Screwing
and glueing this to the rear reflector of the L-model. An even
better solution is to buy a socalled "Toplight" and to mount it
instead of the normal reflector. Both methods have the disadvantage of
the rear light bumping to the ground if the Brompton is folded. The reason for this are
the too small standard castors (rollers) on which the folded bike stands. So:
![]() Enlarge
the castors for standing
Enlarge
the castors for standing
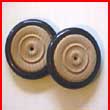
![]() This
meanwhile a standard modification. Replace the too small plastic castors by bigger ones. I
simply used wooden castors with a rubber ring. They are available in every do-it- yourself
shop. The hole is quickly drilled to fit. In the pictures at right you can see the effect.
I just should paint my castors black again...
This
meanwhile a standard modification. Replace the too small plastic castors by bigger ones. I
simply used wooden castors with a rubber ring. They are available in every do-it- yourself
shop. The hole is quickly drilled to fit. In the pictures at right you can see the effect.
I just should paint my castors black again...
![]() Practical
in strange towns
Practical
in strange towns
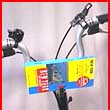
![]() Often I drove through strange towns and had to look to the city map very often.
The clip in the picture at right is simply fixed with sticky tape. It
made the handling of the map much easier.
Often I drove through strange towns and had to look to the city map very often.
The clip in the picture at right is simply fixed with sticky tape. It
made the handling of the map much easier.
![]() Mudguard extension
Mudguard extension
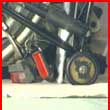
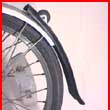
![]() During fast driving in the rain the rear mudguard is not long engough. After I
was totally dirty after my first Brompton ride (at the borrowed Brompton also the front
mudguard extension was removed...), I invented the mudguard extension. Buy a normal
plastic mudguard and shorten it. Saw and file a hole into it, so that it exactly clamps
to the small castor. At right you can see it. After folding I put the extension between
front mudguard and front wheel. This works for more than two years now!
During fast driving in the rain the rear mudguard is not long engough. After I
was totally dirty after my first Brompton ride (at the borrowed Brompton also the front
mudguard extension was removed...), I invented the mudguard extension. Buy a normal
plastic mudguard and shorten it. Saw and file a hole into it, so that it exactly clamps
to the small castor. At right you can see it. After folding I put the extension between
front mudguard and front wheel. This works for more than two years now!
![]() What's
squeaking here?
What's
squeaking here?
![]() At some time I always heard a quiet squeaking during driving. That was quite
nerving. Mainly it appeared during stepping on the pedals and I had the crank bearing
under suspicion. But then sometimes I could hear it when I was just rolling. What was it?
At some time I always heard a quiet squeaking during driving. That was quite
nerving. Mainly it appeared during stepping on the pedals and I had the crank bearing
under suspicion. But then sometimes I could hear it when I was just rolling. What was it?
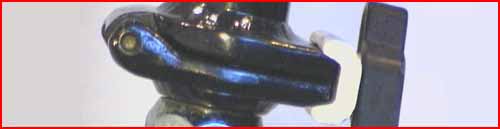
At some time I discovered that it came from the rubber element of the suspension. It has a
screw inside which just had to be oiled.
![]()


![]()